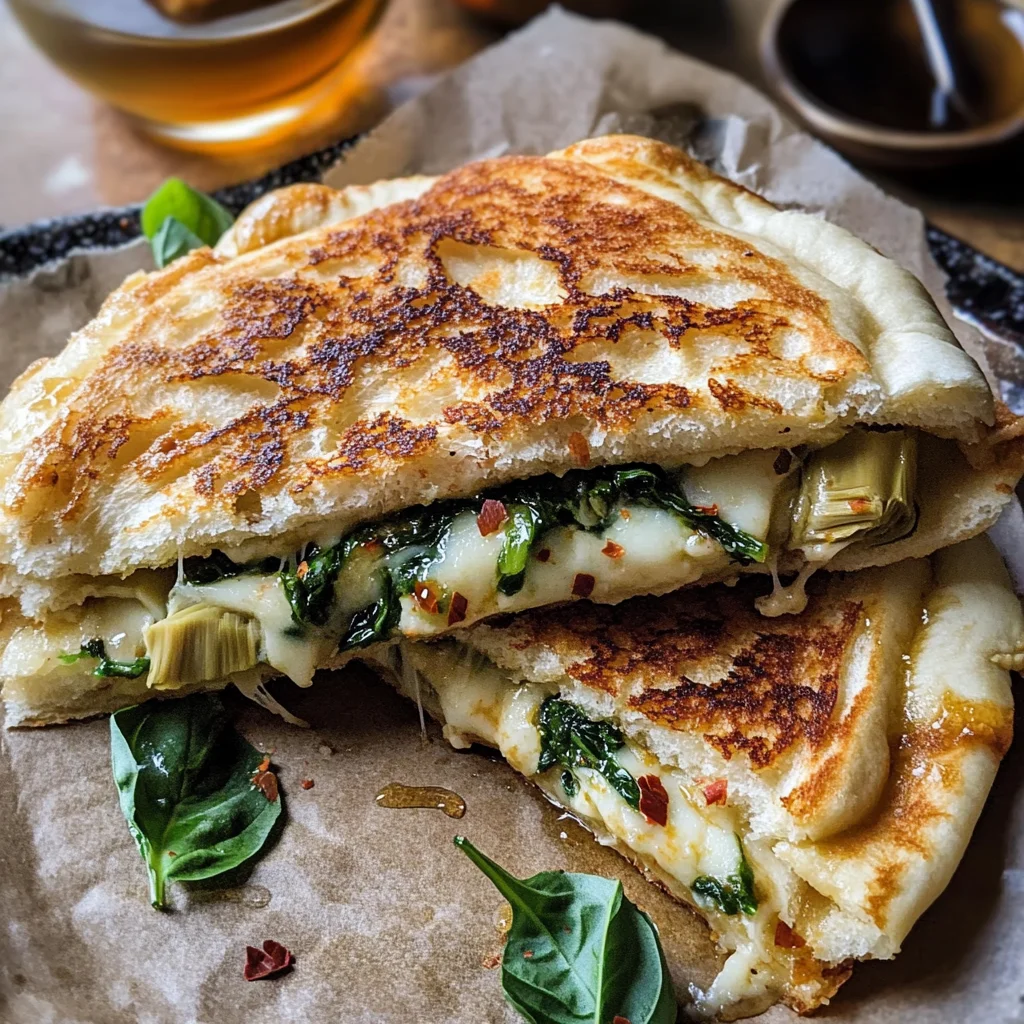
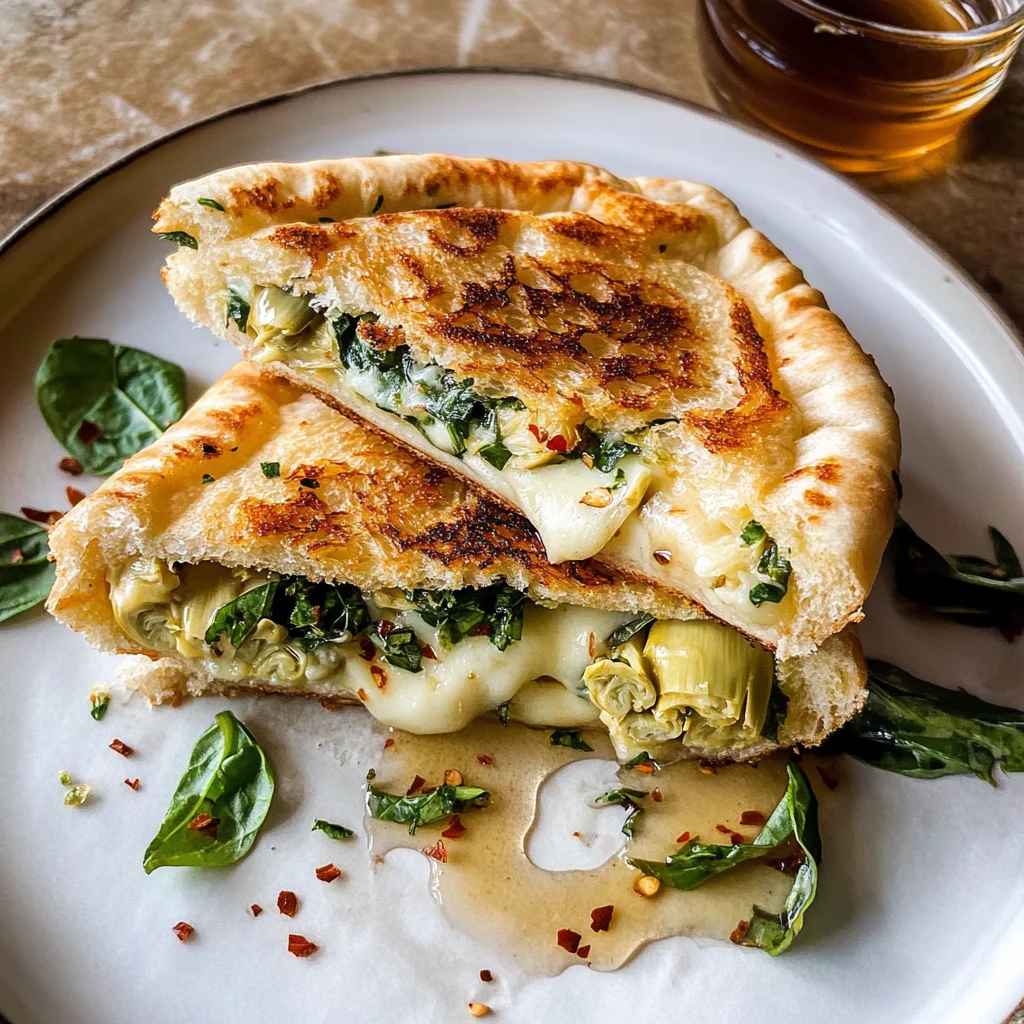
Spinach and Artichoke Pita Grilled Cheese
All the flavors we love about spinach and artichoke dip, stuffed into a soft and fluffy pita grilled cheese. This Spinach and Artichoke Pita Grilled Cheese is perfect for any occasion, whether it’s a cozy family dinner, a casual gathering with friends, or a quick lunch at home. With its gooey cheese and vibrant filling, it stands out as a unique twist on traditional grilled cheese.
Why You’ll Love This Recipe
- Delicious Flavor Combination: The blend of spinach, artichokes, and creamy cheeses creates an irresistible taste.
- Quick and Easy: With just 15 minutes of preparation and cooking time, this recipe is perfect for busy days.
- Versatile Meal: Enjoy it as a snack, appetizer, or main dish that everyone will love.
- Family-Friendly: Even picky eaters will appreciate the familiar comfort of grilled cheese with an exciting twist.
- Customizable Options: Feel free to add your favorite herbs or spices to make it your own!
Tools and Preparation
To create the perfect Spinach and Artichoke Pita Grilled Cheese, having the right tools makes all the difference. Here’s what you’ll need to get started.
Essential Tools and Equipment
- Skillet
- Mixing bowl
- Grater
- Knife
Importance of Each Tool
- Skillet: A non-stick skillet ensures even cooking without sticking, making flipping easy.
- Mixing bowl: Necessary for combining all your delicious ingredients seamlessly.
- Grater: Quickly shreds cheese and garlic to maximize flavor while saving prep time.
Ingredients
All the flavors we love about spinach and artichoke dip, stuffed into a soft and fluffy pita grilled cheese.
For the Filling
- 3/4 cup frozen spinach, thawed, and squeezed of excess water
- 1 cup marinated jarred artichokes, chopped
- 1 cup shredded gouda or fontina cheese
- 1/2 cup shredded mozzarella cheese
- 1/4 cup grated parmesan cheese
- 1 clove garlic, grated
- 1/4 cup fresh basil, chopped
- Red pepper flakes, to taste
For Assembly
- 4 small pitas
- 3 tablespoons salted butter
- Honey, for serving
How to Make Spinach and Artichoke Pita Grilled Cheese
Step 1: Prepare the Filling
In a bowl, combine the spinach, artichokes, mozzarella, gouda, parmesan, garlic, basil, and a pinch each of red pepper flakes, salt, and pepper. Mix until fully combined.
Step 2: Stuff the Pitas
Cut open one side of each pita to create a small opening. Stuff the cheese mixture evenly between each pita. If your pitas don’t have a pocket, simply slice them in half and layer with the cheese mixture.
Step 3: Butter the Pitas
Spread butter generously on the outside of each stuffed pita for that golden crust when grilled.
Step 4: Grill the Pitas
Heat a large skillet over medium heat. Place each pita in the skillet one at a time. Cook until golden brown on each side, about 3-4 minutes per side.
Step 5: Serve
Serve warm topped with honey for drizzling along with chili flakes and sea salt if desired. Enjoy your delightful Spinach and Artichoke Pita Grilled Cheese!
How to Serve Spinach and Artichoke Pita Grilled Cheese
These delicious Spinach and Artichoke Pita Grilled Cheese sandwiches are perfect for a cozy meal. They can be served in various ways to elevate your dining experience.
With Fresh Salad
- A light, crisp salad with mixed greens and a tangy vinaigrette complements the richness of the grilled cheese.
Dipped in Hummus
- Serve with a side of garlic or roasted red pepper hummus for a creamy contrast that adds flavor depth.
Accompanied by Tomato Soup
- This classic pairing helps balance the flavors, providing a warm, comforting experience.
Topped with Avocado Slices
- Fresh avocado slices add creaminess and healthy fats, making the meal even more satisfying.
How to Perfect Spinach and Artichoke Pita Grilled Cheese
Perfecting your Spinach and Artichoke Pita Grilled Cheese can enhance both taste and texture. Here are some tips to help you achieve the best results.
- Use fresh ingredients: Fresh spinach, artichokes, and herbs will elevate the flavor compared to frozen options.
- Adjust cheese variety: Experiment with different cheeses like sharp cheddar or pepper jack for a unique twist.
- Monitor cooking temperature: Cooking on medium heat ensures even melting without burning the pita bread.
- Customize spice levels: Feel free to increase or decrease red pepper flakes based on your spice preference.
- Consider adding protein: Adding shredded cooked chicken or turkey can make this dish more filling and nutritious.
Best Side Dishes for Spinach and Artichoke Pita Grilled Cheese
A well-rounded meal includes tasty sides that complement your main dish. Here are some great side options to enjoy with your Spinach and Artichoke Pita Grilled Cheese.
- Crispy Sweet Potato Fries: These provide a sweet contrast and pair beautifully with the savory pita grilled cheese.
- Roasted Vegetable Medley: A mix of seasonal veggies adds color, nutrients, and flavor to your plate.
- Classic Coleslaw: This crunchy side brings a refreshing element that balances the richness of the sandwich.
- Garlic Breadsticks: Soft, buttery sticks infused with garlic flavor are perfect for dipping into any sauces you choose.
- Fruit Salad: A light fruit salad offers a sweet end to your meal while cleansing the palate.
- Pickle Platter: Assorted pickles add a tangy crunch that pairs well with cheesy goodness.
Common Mistakes to Avoid
To make the best Spinach and Artichoke Pita Grilled Cheese, avoid these common mistakes.
- Not squeezing excess moisture: Failing to remove water from thawed spinach can make the filling soggy. Squeeze out as much liquid as possible to keep the texture right.
- Overstuffing the pitas: Stuffing too much cheese mixture can cause a mess when grilling. Aim for an even distribution without overflowing to maintain a beautiful grilled cheese.
- Using cold ingredients: Starting with cold cheeses can prevent even melting. Allow your cheeses to sit at room temperature for about 15 minutes before assembly.
- Not preheating the skillet: If you don’t heat your skillet properly, the pita may not crisp up. Preheat it on medium heat for optimal results.
- Skipping the butter: Butter enhances flavor and helps achieve a golden crust. Be sure to butter the outside of each pita generously before grilling.
Storage & Reheating Instructions
Refrigerator Storage
- Store leftovers in an airtight container.
- They will last for up to 3 days in the fridge.
Freezing Spinach and Artichoke Pita Grilled Cheese
- Wrap each sandwich tightly in plastic wrap or aluminum foil.
- Freeze for up to 2 months for best quality.
Reheating Spinach and Artichoke Pita Grilled Cheese
- Oven: Preheat to 350°F (175°C) and heat for about 10-15 minutes until warmed through.
- Microwave: Place on a microwave-safe plate and warm for 30 seconds to 1 minute, checking frequently.
- Stovetop: Heat over medium-low heat in a skillet until heated through, flipping halfway.
Frequently Asked Questions
What is Spinach and Artichoke Pita Grilled Cheese?
Spinach and Artichoke Pita Grilled Cheese is a delicious sandwich that combines creamy spinach and artichoke dip flavors with melted cheese, all grilled within soft pita bread.
Can I use different cheeses?
Absolutely! Feel free to mix and match your favorite cheeses like cheddar or pepper jack for a unique twist on this recipe.
How can I customize my Spinach and Artichoke Pita Grilled Cheese?
You can add ingredients like sun-dried tomatoes, olives, or different herbs such as thyme or oregano for added flavor.
Is this recipe suitable for meal prep?
Yes! Spinach and Artichoke Pita Grilled Cheese stores well in the refrigerator or freezer, making it perfect for meal prep.
Final Thoughts
This Spinach and Artichoke Pita Grilled Cheese is not only flavorful but also versatile. Customize it with your favorite ingredients, whether you prefer different cheeses or added vegetables. Give this recipe a try; it’s sure to become a favorite!
Spinach and Artichoke Pita Grilled Cheese

Indulge in the delightful flavors of Spinach and Artichoke Pita Grilled Cheese, a unique twist on a classic favorite. This scrumptious sandwich brings together the creamy goodness of spinach and artichokes with melted cheese, all tucked inside soft pita bread. Perfect for any occasion, whether it’s a cozy family dinner or a casual lunch, this dish is not only quick to prepare but also customizable to suit your taste. With a golden, crispy exterior and gooey interior, it’s sure to impress everyone at the table!
- Prep Time: 15 minutes
- Cook Time: 10 minutes
- Total Time: 25 minutes
- Yield: Serves 4
- Category: Main
- Method: Grilling
- Cuisine: American
Ingredients
- 3/4 cup frozen spinach, thawed and squeezed of excess water
- 1 cup marinated jarred artichokes, chopped
- 1 cup shredded gouda or fontina cheese
- 1/2 cup shredded mozzarella cheese
- 1/4 cup grated parmesan cheese
- 1 clove garlic, grated
- 1/4 cup fresh basil, chopped
- Red pepper flakes, to taste
- 4 small pitas
- 3 tablespoons salted butter
- Honey, for serving
Instructions
- In a mixing bowl, combine thawed spinach, chopped artichokes, gouda, mozzarella, parmesan, grated garlic, chopped basil, and seasonings. Mix well.
- Cut open each pita to create an opening or slice in half if they don't have pockets. Stuff with the cheese mixture evenly.
- Butter the outside of each stuffed pita generously.
- Heat a skillet over medium heat and grill each pita for about 3-4 minutes per side until golden brown.
- Serve warm with honey drizzled on top or alongside your favorite dips.
Nutrition
- Serving Size: 1 stuffed pita (approx. 150g)
- Calories: 350
- Sugar: 3g
- Sodium: 780mg
- Fat: 22g
- Saturated Fat: 12g
- Unsaturated Fat: 8g
- Trans Fat: 0g
- Carbohydrates: 28g
- Fiber: 5g
- Protein: 12g
- Cholesterol: 30mg