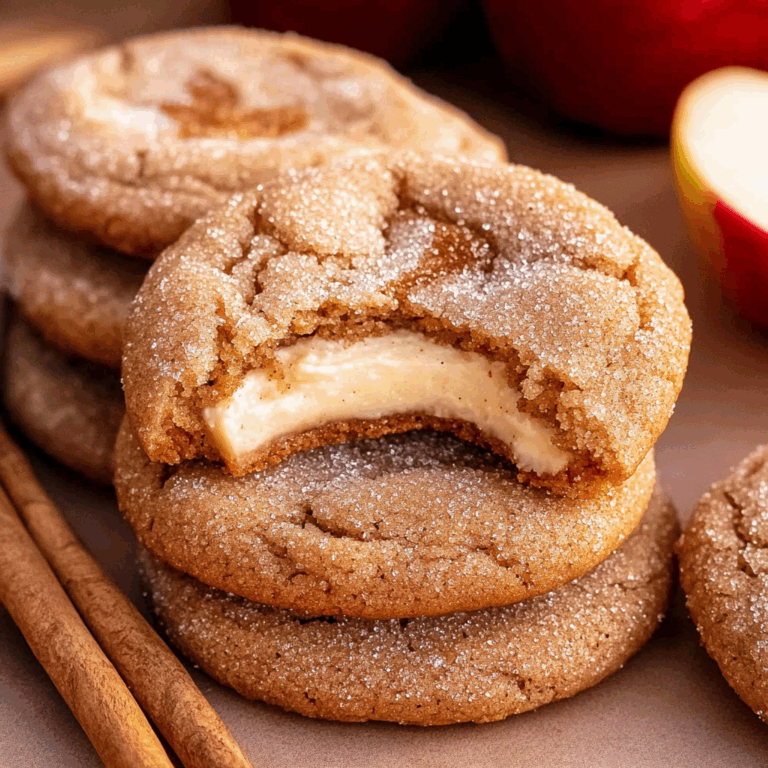
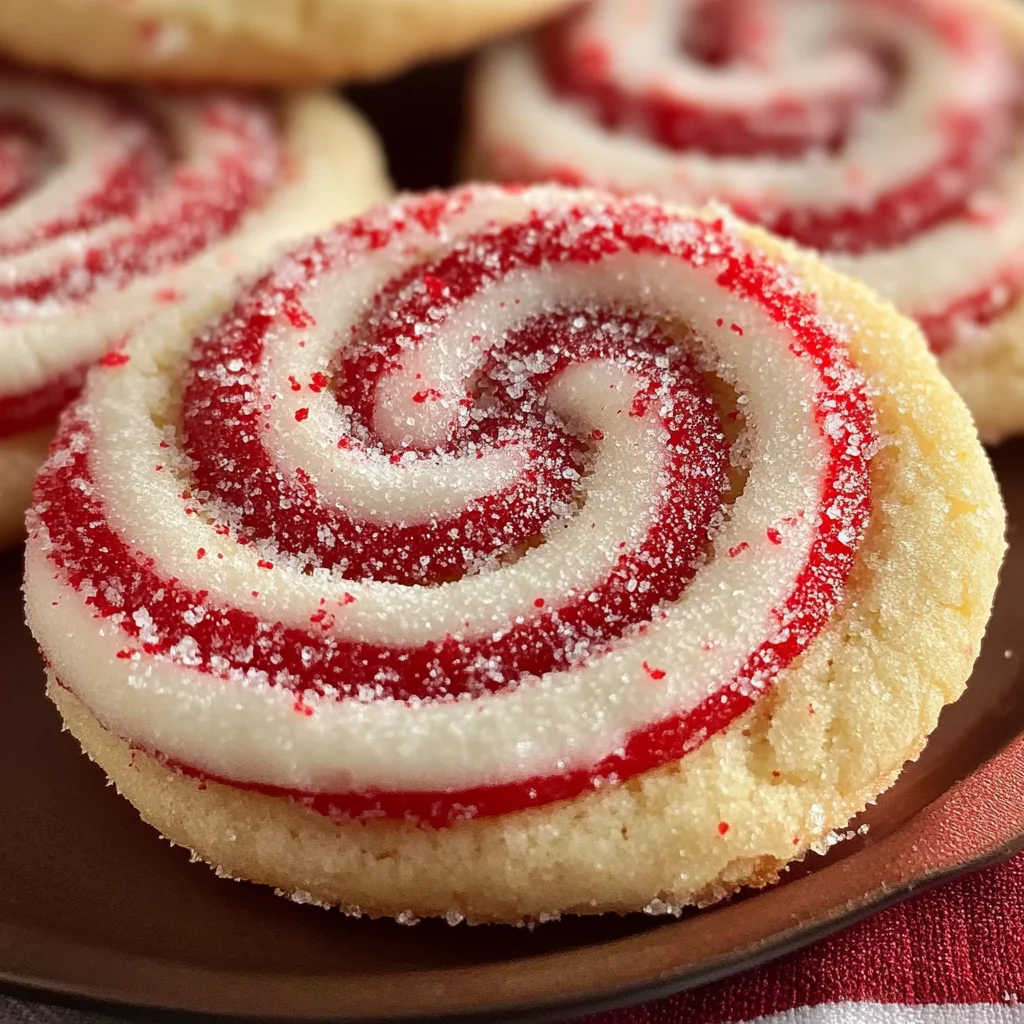
Peppermint Swirl Cookies
Peppermint Swirl Cookies are a delightful treat that brings a festive touch to any gathering. With their vibrant colors and refreshing peppermint flavor, these cookies are perfect for holiday celebrations or cozy family baking sessions. The stunning swirls not only make them visually appealing but also create a unique taste experience. You’ll love how easy they are to prepare while still impressing your friends and family with their charm.
Why You’ll Love This Recipe
- Festive Appeal: The striking red and white swirls make these cookies an eye-catching addition to any dessert table.
- Easy to Make: With simple steps, even beginner bakers can create beautiful cookies without fuss.
- Versatile Flavor: The refreshing peppermint extract adds a delightful twist that pairs well with various occasions.
- Perfect for Gifting: These cookies make wonderful homemade gifts, wrapped up pretty for friends and loved ones.
- Crowd-Pleaser: Their sweet taste and fun presentation will be a hit with kids and adults alike!
Tools and Preparation
Before you start baking your Peppermint Swirl Cookies, gather your tools. Having everything on hand will streamline the process.
Essential Tools and Equipment
- Mixing bowls
- Electric mixer
- Plastic wrap
- Rolling pin
- Parchment paper
- Sharp knife
Importance of Each Tool
- Electric mixer: Makes creaming the butter and sugar effortless, ensuring a light and fluffy cookie dough.
- Rolling pin: Essential for rolling out the dough evenly, which is crucial for achieving those perfect swirls.
Ingredients
For the Cookie Dough
- 2 and 1/2 cups all-purpose flour
- 1 teaspoon baking powder
- 1/2 teaspoon salt
- 1 cup (2 sticks) unsalted butter, softened
- 1 cup granulated sugar
- 1 large egg
- 1 teaspoon vanilla extract
- 1 teaspoon peppermint extract
For Coloring and Coating
- Red gel food coloring
- 1/4 cup coarse sugar or crushed peppermint candies for coating
How to Make Peppermint Swirl Cookies
Step 1: Prepare Dry Ingredients
In a medium bowl, whisk together the flour, baking powder, and salt. Set aside.
Step 2: Cream Butter and Sugar
In a large bowl, using an electric mixer, cream together the softened butter and granulated sugar until light and fluffy. Beat in the egg, then add the vanilla extract and peppermint extract until well combined.
Step 3: Combine Ingredients
Gradually add the dry ingredients to the wet mixture. Mix on low speed until just combined to form a soft dough without overmixing.
Step 4: Divide and Color Dough
Divide the dough in half. Leave one half plain. Add red gel food coloring to the second half until you achieve an even color.
Step 5: Chill Dough for Sharp Swirls
Wrap each half of dough separately in plastic wrap. Chill in the refrigerator for at least 30 minutes. This step is vital for keeping colors from bleeding during rolling.
Step 6: Roll Out Dough
Once chilled, roll out the plain dough into a rectangle measuring 10×12 inches and about 1/4 inch thick. Repeat with the red dough.
Step 7: Layer Doughs Together
Carefully place the red rectangle on top of the plain rectangle. Press them together gently.
Step 8: Roll Into Log Shape
Starting from one long side, carefully roll the layered dough tightly into a log shape. Press gently to eliminate air pockets as you roll.
Step 9: Second Chill for Firmness
Wrap the log tightly in plastic wrap again, then chill in the refrigerator for at least 2 hours or until very firm.
Step 10: Preheat Oven
Preheat your oven to 375 degrees F (190 degrees C). Line baking sheets with parchment paper.
Step 11: Coat Dough Log
Remove chilled log from the refrigerator. Brush lightly with water or whisked egg white if desired, then roll it in coarse sugar or crushed peppermint candies to coat evenly.
Step 12: Slice Cookies
Using a sharp knife, slice the log into rounds about 1/4 inch thick. Place sliced cookies about an inch apart on prepared baking sheets.
Step 13: Bake Cookies
Bake for 8 to 10 minutes until edges are lightly golden—be careful not to overbake.
Step 14: Cool Before Serving
Let cookies cool on baking sheets for a few minutes before transferring them to a wire rack to cool completely.
Enjoy your delicious Peppermint Swirl Cookies!
How to Serve Peppermint Swirl Cookies
Serving Peppermint Swirl Cookies is a delightful experience that enhances their festive charm. Here are some creative ideas to make your cookie presentation even more enjoyable.
Cookie Platter
- Arrange your cookies on a decorative platter, mixing them with other holiday treats for a vibrant display.
Hot Chocolate Pairing
- Serve these cookies alongside a warm mug of hot chocolate. The peppermint flavor complements the rich chocolate perfectly.
Gift Wrapping
- Package the cookies in festive bags or boxes to give as gifts. Add a personalized tag for a special touch.
Dessert Table Feature
- Include the cookies as part of a dessert table at holiday gatherings. Their colorful swirls will catch everyone’s eye.
Ice Cream Sandwiches
- Use two cookies to create delicious ice cream sandwiches. Choose peppermint or vanilla ice cream to enhance the flavor.
How to Perfect Peppermint Swirl Cookies
Perfecting your Peppermint Swirl Cookies can elevate your baking skills and impress your guests. Here are some essential tips:
-
Chill the Dough: Allowing the dough to chill makes it easier to handle and ensures cleaner swirls when rolling.
-
Don’t Overmix: Mix just until combined after adding dry ingredients. This helps maintain a soft texture.
-
Use Quality Extracts: Opt for pure peppermint extract instead of artificial flavorings for a more authentic taste.
-
Control the Color: Add gel food coloring gradually until you achieve your desired red shade. This avoids overly vibrant or pastel colors.
-
Consistent Thickness: Roll out both doughs to the same thickness for even baking and perfect swirls.
Best Side Dishes for Peppermint Swirl Cookies
Pairing side dishes with Peppermint Swirl Cookies can enhance your holiday spread. Consider these delightful options:
-
Hot Chocolate
A rich and creamy beverage that balances the sweetness of the cookies, making it a perfect pairing. -
Peppermint Bark
A crunchy treat made with layers of chocolate and minty flavors; it complements the cookies beautifully. -
Fruit Salad
A refreshing mix of seasonal fruits can provide a light contrast to the sweetness of the cookies. -
Cheese Platter
A selection of mild cheeses can provide a savory balance, enhancing the overall dessert experience. -
Spiced Tea
Warm spiced tea offers comforting flavors that pair well with peppermint, creating a cozy atmosphere. -
Nut Mix
A mix of roasted nuts adds crunch and can serve as an excellent contrast to soft cookies, making for an interesting texture combination.
Common Mistakes to Avoid
Making Peppermint Swirl Cookies can be a fun and rewarding experience, but there are common pitfalls to watch out for.
- Not Chilling the Dough: Failing to chill the dough before rolling can lead to sticky batter and bleeding colors. Always chill your dough as instructed to ensure neat swirls.
- Overmixing the Dough: Overmixing can make cookies tough. Mix until just combined for a soft, tender cookie.
- Incorrect Rolling Thickness: Rolling the dough too thin can result in burnt edges. Aim for about 1/4 inch thickness for even baking.
- Skipping the Second Chill: The second chilling step is crucial for maintaining the shape when slicing. Don’t skip this step if you want perfect swirls.
- Overbaking the Cookies: Cookies can go from perfect to burnt quickly. Keep an eye on them and remove them when they are lightly golden at the edges.

Storage & Reheating Instructions
Refrigerator Storage
- Store cooled cookies in an airtight container for up to 1 week.
- Place parchment paper between layers to prevent sticking.
Freezing Peppermint Swirl Cookies
- Wrap cookies tightly in plastic wrap and place in a freezer-safe container.
- They can be frozen for up to 3 months.
Reheating Peppermint Swirl Cookies
- Oven: Preheat oven to 350°F (175°C) and heat cookies for about 5-7 minutes.
- Microwave: Heat cookies individually on a microwave-safe plate for about 10-15 seconds.
- Stovetop: Warm cookies in a skillet over low heat for a few minutes, covering with a lid.
Frequently Asked Questions
Here are some common questions about making Peppermint Swirl Cookies.
Can I use other extracts instead of peppermint?
Yes! You can substitute peppermint extract with other flavors like vanilla or almond for different taste profiles.
How do I make my Peppermint Swirl Cookies more festive?
Consider adding festive sprinkles or colored sugar on top before baking for extra holiday flair!
Can I make these cookies gluten-free?
Absolutely! Use a gluten-free all-purpose flour blend to maintain the texture and flavor of your cookies.
How do I store leftover Peppermint Swirl Cookies?
Store them in an airtight container at room temperature or refrigerate them for longer freshness.
What is the best way to decorate Peppermint Swirl Cookies?
You can drizzle melted chocolate or sprinkle crushed candy canes on top after baking for added decoration!
Final Thoughts
These Peppermint Swirl Cookies are not only visually stunning but also deliciously festive, making them perfect for any holiday gathering. Feel free to customize them with different colors or flavors to suit your preferences. Give this recipe a try and enjoy the delightful twist it brings to your dessert table!
Peppermint Swirl Cookies
Peppermint Swirl Cookies are a delightful and colorful addition to any festive gathering. These cookies feature eye-catching red and white swirls, making them not only visually appealing but also perfect for holiday celebrations or cozy family baking sessions. With a refreshing peppermint flavor and a sweet crunch from the sugar coating, these treats are sure to impress both kids and adults alike. They are easy to prepare, allowing even beginner bakers to create stunning cookies that look professionally made. Whether displayed on a dessert table, served with hot chocolate, or given as gifts, these Peppermint Swirl Cookies will add charm to your holiday festivities.
- Prep Time: 20 minutes
- Cook Time: 10 minutes
- Total Time: 30 minutes
- Yield: Approximately 24 cookies 1x
- Category: Dessert
- Method: Baking
- Cuisine: American
Ingredients
- 2 and 1/2 cups all-purpose flour
- 1 teaspoon baking powder
- 1/2 teaspoon salt
- 1 cup unsalted butter, softened
- 1 cup granulated sugar
- 1 large egg
- 1 teaspoon vanilla extract
- 1 teaspoon peppermint extract
- Red gel food coloring
- Coarse sugar or crushed peppermint candies for coating
Instructions
- Whisk together flour, baking powder, and salt; set aside.
- In a large bowl, cream softened butter and granulated sugar until light and fluffy. Beat in the egg, then add vanilla and peppermint extracts.
- Gradually mix in dry ingredients until just combined.
- Divide dough in half; color one half with red gel food coloring.
- Chill both doughs wrapped in plastic wrap for at least 30 minutes.
- Roll out each dough into rectangles (10×12 inches).
- Layer colored dough on top of plain dough; roll tightly into a log shape.
- Chill the log again for at least 2 hours.
- Preheat oven to 375°F (190°C); line baking sheets with parchment paper.
- Coat chilled log with water or whisked egg white; roll in coarse sugar or crushed candies.
- Slice log into rounds about 1/4 inch thick; place on prepared sheets.
- Bake for 8-10 minutes until edges are lightly golden; cool before serving.
Nutrition
- Serving Size: 1 serving
- Calories: 117
- Sugar: 7g
- Sodium: 50mg
- Fat: 6g
- Saturated Fat: 4g
- Unsaturated Fat: 2g
- Trans Fat: 0g
- Carbohydrates: 14g
- Fiber: <1g
- Protein: <1g
- Cholesterol: 15mg